Showing posts with label DIY. Show all posts

6.19.2015

DIY Project: Inbox tutorial


For A5 size 


I took a 12" craft paper (ca 30.5 cm wide). Cut to 21 cm tall. 


Mark at 16 cm, scratch it... 


and fold it.

At the edge mark 8 cm from the top, where will be folded, 8 cm from the bottom. Cut the top part.


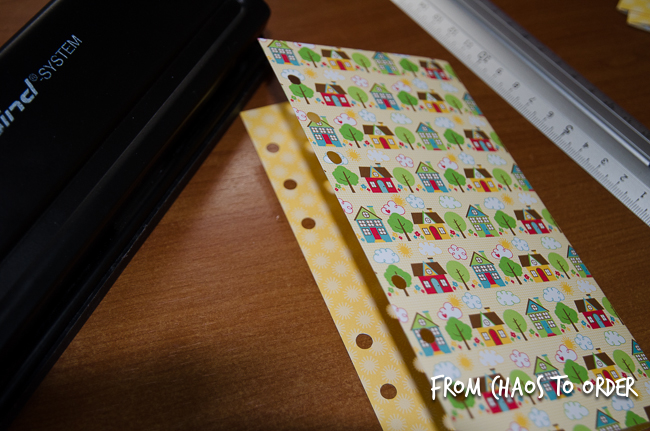
Use washi tape to stick it, and punch. 


As you can see, it is not closed at the rings, hopefully it will be enough. But I hated the idea to waste paper, and then it should have been glued at the sides too. 

In use: in this size it can hold a folded A4 size paper.

For personal size

Do the same as by A5, only the numbers are different: Cut 21x17 cm double sided paper, fold by 10.5 cm. Cut the pocket by 7 cm from the top at the edge and from the bottom at the folding-line.

By this version I had the correct width and used washi tape by the side too. If you make this way, first punch the paper, use washi, than punch again!


And my big pain: it cannot hold an A4 paper even folded in 4...


Read more…

6.12.2015

Tutorial: How to make a foldable sticky note holder?

How to make a foldable sticky note holder?


I have some sticky notes what I like, but they are not too sticky. I use for it glue. Keeping them on a divider as usual is not an option. I created this holder to my personal size planner.

Step 1: 

I used cardstock paper for it, I cutted to size. For A5 size, you should have 21x29.6 cm paper - which is exactly A4 size :) Cut the stripes for the same with and the wished high.


Step 2: 

Fold all pieces to half


Step 3: 

Punch it


Step 4:

Fasten the stripes to the holder with the help of washi tape. (As you can see, I kept the stripes on place with some little piece of washis.) Cut the unnecessary washi.


Step 5:

Strengthen the holes by using washi tape on the other side too.


Step 6:

Hole punch again.


Step 7:

Cut to the holes on the right side: it will allows you to open the holder without open the rings.


Step 8:

Enjoy!

Read more…

5.22.2015

The big tab problem - solved!

I wanted an A-Z index to my A5 Info Filofax. I found only 2 letters per dividers, and on Amazon with german letters. And I also don't wanted to wait. But my tabs are too big. I want small tabs! But I find no small tabs.... And then! I found the solution: take scissor and cut it to half. Pffff. Index dividers: done. I took simple notepaper, I can write on them too.


Read more…

5.14.2015

Page marker with daily routine

I made this page marker after the idea from Kent from Oz. 


How it is built: I laminated a paper, same width as the inserts, and a little bit taller (6mm). I laminated a protector page without paper, and cut to the same height, and 6 cm wide. I took wash tape, and first I glued the two piece together, when the smaller was on the top of the larger (that leaves enough space between the two pieces). then I opened it, and used an other stripe of wash tape on the other side. My addition to it: I cut a piece  from the notepaper of the daily insert. I wrote my daily routine, and glued on the leaf that way, when I fold the marker, it matches to the notepaper insert. I can draw now my checkboxes there.

Read more…

3.05.2015

DIY project: creating a transparent holder


For little piece of papers, or stickers is a transparent holder very useful.
I bought thicker sheet protectors in A4 size.


Marked the size of a divider (wider as an A5 page!) with CD marker.


Cut to size.


I cutted also a diagonal from the first side starting from the middle of the pocket and sticked together with washi tape.


Repunched for Filofax rings, and started to use :)


Happy planning!

Read more…

2.15.2015

DYI project: Pocket for the divider


As I wrote in the "The 17 Dividers" post, it can be very useful to create a pocket on a divider. Sometimes you have to keep in your planner something what cannot be punched. I will show in this tutorial, how I made pockets to my dividers.

Step 1: 

Take an already done divider...


 ... or make one. Very important: it has to be punched already!


 Step 2:

Cut a paper to the half size of your divider. Punch it.


Step 3:

With some washi tape you can fix your papers. Stick the bottom of the two pieces together with washi tape.


Step 4:

Stick the sides.


Step 5:

Punch the washi tape.


Step 6:

Use it!


Read more…